Canva is a popular online graphical application that helps teachers and students produce stunning final projects by combining design, image editing, and layout. Canva was established on 1st January 2013 by Melanie Perkins, Cameron Adams and Cliff Obrecht in Perth, Australia. The usage of Canva can be spotted in 190 different countries, and it is now stated that there is 7 billion design created on Canva in the span of 9 years. Canva strives for everyone in the world to have the ability to design anything, share and publish it anywhere.
The existence of Canva is to make complex things appear simple but has a practical and pragmatic solution to every user’s problems. It also aims to help users succeed in their projects after setting up ambitious and big goals. I also think Canva always empowers the users to grow and excellently develop their skills to help them achieve their personal goals in every project they contribute to. With that being said, Canva is undeniably an application that suits teachers and students in their teaching and learning process. Teachers can use Canva to create posters, guides, and projects, while students can also use it to complete their homework. Students can use useful featured tools that help to produce clear, well-finished presentations and school projects quickly and hassle-free!
Before explaining the tools and features of Canva that suit both teachers and students, let us look at the steps needed to sign up for it. One can sign up and log in to Canva in a few different ways. Three popular ways to sign up for Canva are using an email address, Google account and Facebook account. People can also sign up using Apple Account, Microsoft Account and phone or mobile number. The first step to sign up for a Canva account is by choosing the email option on the sign-up page. Next, fill up the email address you would like to use for Canva and put a reliable password. After that, follow the instructions in the email that has been sent to the given email address to verify your email address. After being done with that, enter the confirmation code that has been sent to you via email, and your account has been created! It is to be remembered that teachers and students, big companies, and nonprofit organisations have a different and special version of Canva, which are Canva for Education, Canva for Enterprise, and Canva for Nonprofits, respectively. One has to be eligible and provide supporting details to use those special Canva accounts!
Three main Canva plans are Canva Free, Canva Pro and Canva Enterprise. As Canva Enterprise’s features are not and will not be focusing on Education, we will not discuss it further. Signing up for Canva Free comes with more than 250,000 templates, more than 100 design types, hundreds of thousands of photos and graphics, collaboration, and 5GB of cloud storage. On the other hand, Canva Pro is charged at RM 249.90 per year, which offers all the free features but has brand kit upload options, one-click Magic Resize for images, more than 610,000 templates, 100 million images, videos and graphics, design saving for team use, 100GB of cloud storage, and social media scheduling for eight platforms.
One of the advantages of using Canva for teachers is they can make and design their own lesson plans for every classroom using the lesson plan templates on Canva. Lesson plan creation is one of the most effective uses of Canva for Education. Canva makes it simple to envision and produce successful lessons, whether teachers brainstorm teaching ideas, plan a lesson plan, write instructional text, produce lecture slides, design visual aids, or experiment with new methods to communicate and introduce the learning concepts to their students. There are over a million graphics and 65,000 layouts available on Canva. Teachers can change the background, shape, font style, text content, and position of the existing template or create their templates easily. Teachers can filter their search based on the style, theme and colours. Without any bothersome re-formatting issues, photos can be uploaded and altered.

Next, another feature on Canva called worksheet template is helpful for teachers because they can construct their own worksheets and exercises for their students. Sometimes, teachers often feel frustrated with some worksheets that do not fully meet their course’s goals. Teachers also often wish that they could adjust and modify certain exercises’ language and the structure of the questions. Using Canva, they may create and personalise their own worksheets and class activities. Teachers can create their own template or choose from various pre-made templates, including everything from writing exercises, diary entries and book reviews, to multiplication tables, word problems, and science puzzles. They can also filter the search section according to the target subjects, preferred format and style, theme and colour. Making copies of their worksheets and exercises is also a piece of cake. They simply need to click the “Copy this page” icon to the right of the design, and Canva will create a duplicate for them.


Furthermore, Canva is also beneficial for teachers. Teachers can ask their students to design posters, guidelines, and school projects using the features and layout in Canva, such as the presentation feature, video feature, poster feature and many more. Students can access powerful tools and features that aids expression to create clear and well-finished presentations. This way, teachers can ensure the classroom setting is conducted in collaborative-centred teaching and expect positive and engaging teamwork from their students. Some of the suggested topics assigning designing assessments for students are “Climate change and how to prevent it in your own way” or “How to make this world a better place for everyone”. According to the teachers, the topics for the assessments can be pretty straightforward or challenging. This way, students will present their thoughts and views on the given topics and be further discussed in the class. Teachers can also improve their teaching skills by focusing more on the “design component” for their classes. Canva is a handy tool that mainly really helps to stimulate creativity among students. It also allows much flexibility where students can play around with the available features. When using these features on Canva, we can see that it is a win-win situation for both teachers and students. Canva is very generous as almost every feature can be accessed by teachers and students for free if they use the given educational institution email. One can use their student email and just log in using Canva Education.
For students, one of the few features that caught my attention on Canva is the ability to create fantastic and eye-catching presentations, school works and videos using a variety of layout templates. These features are one of the reasons why I choose to pick Canva as my go-to online presentation and graphic editing tools. Canva is a wonderful solution for developing presentations and lecture slides. Students can pick and choose from thousands of templates to display new material in a colourful, engaging way when they create new school projects such as videos presentations, presentation slides, posters, infographics and many more.
When students are doing their school works on Canva, they can directly use all of the elements featured, such as adding photos, graphics, videos, and audio to their works to enhance and make it more attractive. Students can also use the graph elements in Canva to show mathematical, statistical or any scientific idea in addition to producing text- or image-based graphics. They can visualise values using colourful, meaningful artwork instead of graph paper charts. Some of the charts available on Canva are flow charts, Venn diagrams, strategy maps, bar graphs, pie charts and many more. Students can certainly modify them up to their likings. Next, students also can insert and upload media (images, videos, audios) or record themselves right on the spot. Students can drag the selected media to directly upload it in Google Drive, Dropbox, Facebook, and Instagram when uploading any media. It is so convenient, is not it? Not only limited to media, but students can also pick any text from various designs to change the fonts on their works. They can also pick their preferred theme colour from the colour palette given by Canva. If the students choose to change the background for a particular page or a different background for each page, they can customise it to their liking as that function is also available to use on Canva. Logos, charts, emoji, giphy, QR Code, Pexels, Pixabay, and Youtube Videos are some of the useful features that students literally can play around and mix match with all these features and integrate them into their works.


Next, Canva also has this feature where students can directly present and record their work. I honestly favour this feature because it is so convenient and saves so much time. In this feature, students will be able to see their work (presentation slides, posters, infographic etc.) while recording. This feature makes it easier for students to complete everything in one application. Students can save their work in PDF, JPG, MP4 and many more after they are done presenting their works. They can now choose to save, make a copy and download their files according to their desired and preferred way. All works in Canva are auto-saved, so students (including me) will never have to worry about losing out on works when any unwanted incident strikes, such as a blackout.
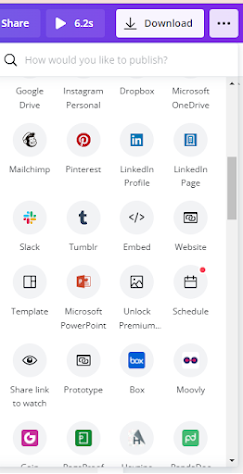
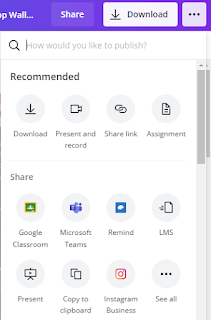
Moreover, after students are done with their works, they can easily share their works to various platforms such as Google Classroom, Microsoft Teams, Remind, LMS, Facebook, Twitter, Instagram and many more! This feature will make teachers’ lives more manageable because after they are done with their lecture slides, they can directly share them with their students on Google Classroom!
Students may also use all features and use the Presentation Mode function. Using that can help to expand students’ presentation design to occupy and fill their entire screen. While doing that, students may also browse between slides by using the left and right arrows on their keyboard. This mode is activated by hitting Ctrl, Shift, Enter, and exited by pressing escape. Students can also share their works with others (classmates and lecturers) in the form of an interactive and responsive website.
First, students must select the ••• button in the top right corner of their Canva profile. Second, scroll down and choose the Website feature. Third, they need to choose the preferred web styles (presentation scrolling, classic navigation and standard). Fourth, to see how the website will appear, click preview. Lastly, copy the website’s URL link and distribute it to their friends and lecturers.


The following helpful feature for students, which I personally love, is the group projects feature. Students can create a free group with up to ten members to collaborate, exchange designs and share folders more easily. Within their group, individuals can share as many designs, images, and elements as they like in up to two folders, which is excellent for drafting, modifying, and collaborating on projects. They can also do peer-review by liking, commenting, discussing and modifying each other's work. Then, with a single click, students may publish their work and designs on Facebook, Twitter, and other social media platforms. They can "publish and share their works as an editable design" if they want others to be able to change them. I love how Canva's templates and designs are already ideal for collective projects in many cases. Students can work on various projects, including newsletters, magazines, infographics, presentations, reports and many more!


As we have been discussing mainly the advantages of Canva, let us move on to its disadvantages. I mainly have not been experiencing major disadvantages, but one of the major drawbacks for Canva is the editing interface. Canva is best used on big screens such as laptops, computers, or even tablets, and it is less favourable on smartphones. The users can still edit and do their work on Canva through smartphones, but the overall experience might not be the best as it will lag, and some of the features will not load properly on smartphones. Next, even though Canva can be accessed through smartphones (on mobile applications) and other electronic devices (on the website), the mobile application lacks over half of the features found in the desktop version. So, if the users choose to edit using their smartphones despite the difficulty, it is kind of hard for them as some of the features that are available on the website will not be available on the mobile application version.
Before I end this blog post, I honestly chose Canva to do my infographic for all the reasons listed above. I love how Canva has everything I can ever ask for in a graphic and online editing tool. I am pretty satisfied with the features available on Canva and how students like me can get most paid features for free when using student email. While completing my infographic, although it was difficult at first, I managed to finish it with the help of the tools and features on Canva. I can easily and directly use all of the main elements, such as images, video and stickers, in my infographic. The usage of those elements made my final work much attractive than before. I also love that I can choose various fonts available for free on Canva to mix and match in my work. The colour code feature is also attractive, and I honestly use it a lot. I mixed and colour-coordinated my work to be mainly pink, and the final work appears decent enough! I am not really good at Photoshop, as tech-savvy is not my middle name, so Canva is already enough for me! I will never stop recommending this feature to my friends so that they can benefit from this application as much as I do!
Canva is definitely a game-changer for a college student like me. The user interface is simple, easy to use and utilising the programme is straightforward, easy and enjoyable. The built-in design and templates are so appealing and up-to-date, making the process of choosing the right template so smooth for the users. The list of templates will keep on growing, so the users will have no problem choosing the best one for their works and projects. With all of the features on Canva, the users will be able to concentrate on delivering the needed information efficiently and designing good projects is genuinely one click away. One cannot stop using Canva once they have tried it, as Canva truly helps accomplish and fulfil users’ course goals and instructional needs.
This is the infographic that I made using Canva!
Disclaimer: The photos were taken from Google and Canva Websites.


0 comments